
Where do you stand on the use of gift tags?
Let’s look at the gift tag pros and cons as it pertains to handcrafted tags.
CONS
- the quantity of gift tags needed
- the time it takes to craft the gift tags
- the gift tags look pretty for a few moments and then are rolled up with the wrapping paper scraps and are discarded
- environmental impact of additional waste
PROS
- packages look festive
- spend time with your crafting hobby to make something pretty for your gift recipients.
- enjoying the feedback you get from your handcrafted treasure
- creating the tags that you instead of what a store thought you might want
- controlling the quantity, quality and price of the tags
Valid points
The pros and cons list both contain some valid points. And I admit that I’ve been pro gift tag at some points in my life and at other times, not so much.
What factored into my decision when my kids were little is that they didn’t care what the tag looked like. They loved the wrapping but the tag merely indicated who the recipient was. Now, I do like to spend more time putting gifts together and adding cute tags. (full confession: by the time I make Christmas cards to send and and the samples for classes, etc, I often run out of time to make all my tags. I am working on a solution to that which I’ll share later on.)
Let’s conquer the cons
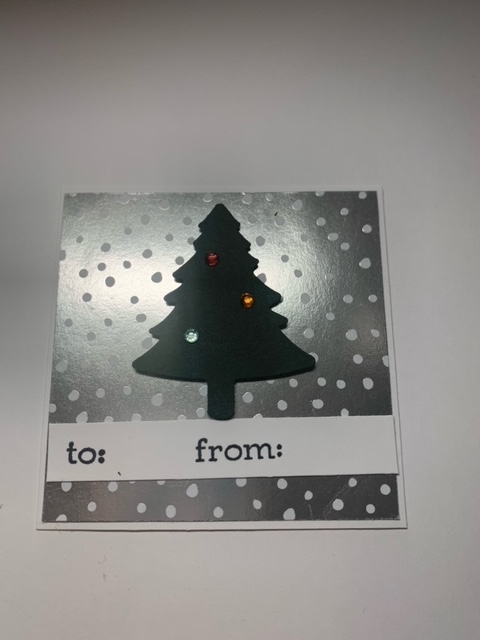
(Please excuse the photo quality…it is difficult to get a good image with the foiled paper.)
First I will start with the environmental issue.
I am an avid scrap keeper. I find those little bits and pieces come in handy while saving me from cutting into a fresh piece of card stock for just a small bit. This gift tag uses up bits and pieces that others would have had in the recycle bin long ago.
The Basic White strip with the sentiment were scraps from cutting an 8.5x 11 piece down to (4) 4×5.25 card fronts or inside panels.
While the DSP came from full 6×6 sheets, it was retired paper I would not be using in a class. Additionally, I sized the gift tags so that I got (4) 3×3 squares from the DSP, leaving no waste! Some of the tag bases (3 1/8 x 3 1/8) of Basic White were cut from various scraps.
For these tags, I will not be using ribbon. Instead, I’ve added a small strip of tear n’ tape on the backside of the tag. When I’m ready to use the tags, I just remove the backing and stick it on.
One final thought on the waste issue. Although this thought doesn’t fit with the idea of using scraps and keeping the design simple, it does address the issue of gift tags becoming instant trash once the gift is opened. Make the gift tag so it can be kept as an ornament or keepsake. You could include a recent photo of the recipient on the tag, add the date, a lovely bow and more to turn it into a keepsake. Perhaps you will see your tags years from now hanging on a friend’s tree.
Addressing the quantity and time issues
Because you are the designer, you can make them as simple as you’d like to save time. I whipped up 20 of these while watching tv with my family. The card base and DSP were easily cut with my paper trimmer and adhered together. (Note…avoid liquid glue (which I usually love) when working with foiled paper. It gets messy FAST!)
Next, I used the pine tree punch for the trees which was super quick! Then I added holiday rhinestone gems although you cannot see the colors well in the photo. Some have little pearls instead.
Finally, I stamped the sentiment and adhered it to the tag followed by the tree. SUPER EASY!!!
What made this layout super simple was using my trimmer and punch. Die cuts make lovely tags, too, but do add time to the process since you are die cutting one at a time.
By adding the adhesive to the back of the tag, i saved time not cutting ribbon and tying bows.
You can do this with any supplies you have. Do you have some random bits of holiday DSP left? Use them up to make something cute while getting those scraps out of your craft room. It’s great to save scraps…but then you’ve got to use them. LOL
Solution to getting it all done
Earlier I alluded to a solution I am working on to make sure it all gets done. START EARLY…LOL…I know that sounds pretty darn obvious but it’s not so easy to really do.
After the holidays, when you have some crafty time, gather up your holiday supplies one more time to whip up some gift tags. When the pressure is off, you will be AMAZED at how the creativity flows, how much fun you are having and how quickly you will amass a pile of gift tags. If you really get into a groove, you may find that you have created a stash to last more than one season.
A word of advice: REMEMBER WHERE YOU PUT THE COMPLETED TAGS. Haha – sounds pretty simple but we all know what our craft spaces look like. And we all know how it goes when we put things away for safe keeping and we do such a good job that those items are now safe from us!! Tuck them away and then make a note on your calendar during the next holiday season, where exactly you put those gift tags! You’ll be glad that not only did you make your gift tags, but that you know where to find them when you need them.
Where do you stand on hand crafted gift tags?
Please share, in the comments, your thoughts and practices regarding hand crafted gift tags! I’d love to know what you think and if you do make your own tags, please submit a photo!!
Does making your own gift tags sound fun? You can use this link to shop for some high qualities supplies. Message me if you need help getting started!
View the current catalogs.
HAPPY CRAFTING!!!
HAPPY THANKSGIVING to you all. I know things aren’t quite back to normal yet and you may not be gathering with others. I do hope that you feel the love and gratitude your friends and family have for you. Maybe you can reach out and share the love and gratitude you have for those who cannot be present at your table this year.
All the best,
Elisa O’Neill